Nov 1, 2023 | Tips & Tricks
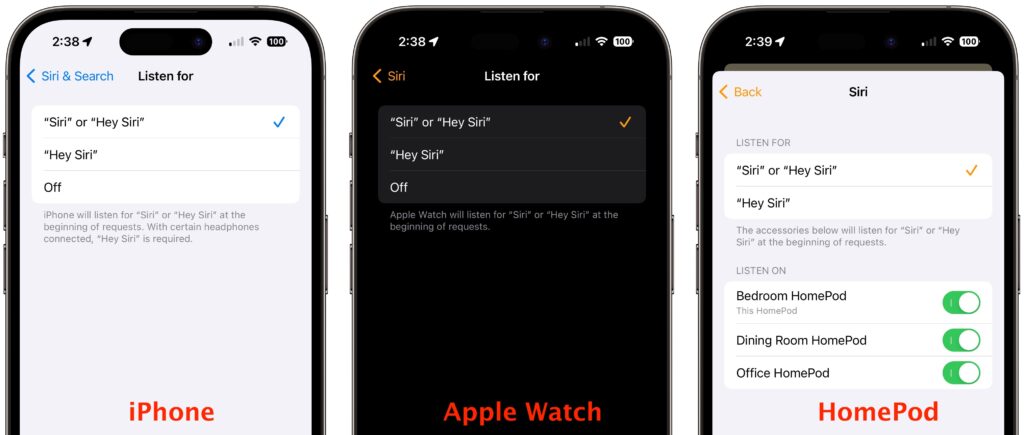
If you use Siri, particularly on a HomePod, you’re probably accustomed to saying “Hey Siri” as the trigger phrase before your requests. In Apple’s new operating systems for 2023, you can now choose to invoke Siri using the traditional “Hey Siri” or just “Siri” (at least in Australia, Canada, the UK, and the US). You might appreciate being able to stop saying “Hey” every time, or you might find that using just “Siri” generates incorrect activations. (And if someone in your family’s name sounds like Siri, you may want to turn the feature off entirely!) There are four places to look:
- iOS 17 and iPadOS 17: Settings > Siri & Search > Listen For
- macOS 14 Sonoma: System Settings > Siri & Spotlight > Listen For
- watchOS 10: Watch app > My Watch > Siri > Listen For
- HomePod Software 17: Home app > long-press HomePod > Accessory Settings > Listen For “Siri” or “Hey Siri”
(Featured image based on an original by Apple)
Nov 1, 2023 | Tips & Tricks

In 2013, Apple added Touch ID to the Home button of the iPhone 5S. Taking advantage of the uniqueness of fingerprints, Touch ID combines the Home button press to wake up the iPhone with a fingerprint scan to authenticate the user. But in 2017, Apple introduced the iPhone X with Face ID, which relies on cameras and sensors at the top of the screen to authenticate the user via facial recognition. Since then, Apple has slowly been phasing out Touch ID in the iPhone line, with only the third-generation iPhone SE still supporting it. (Only the iPad Pro models have Face ID; other iPads have Touch ID in the Home button or the top button.)
We’re not here to dub one better than the other, but many people find themselves needing to upgrade from an older iPhone with Touch ID to a newer one with Face ID. If you’re trying to switch between Touch ID and Face ID, we have some tips to help.
Unlock the iPhone
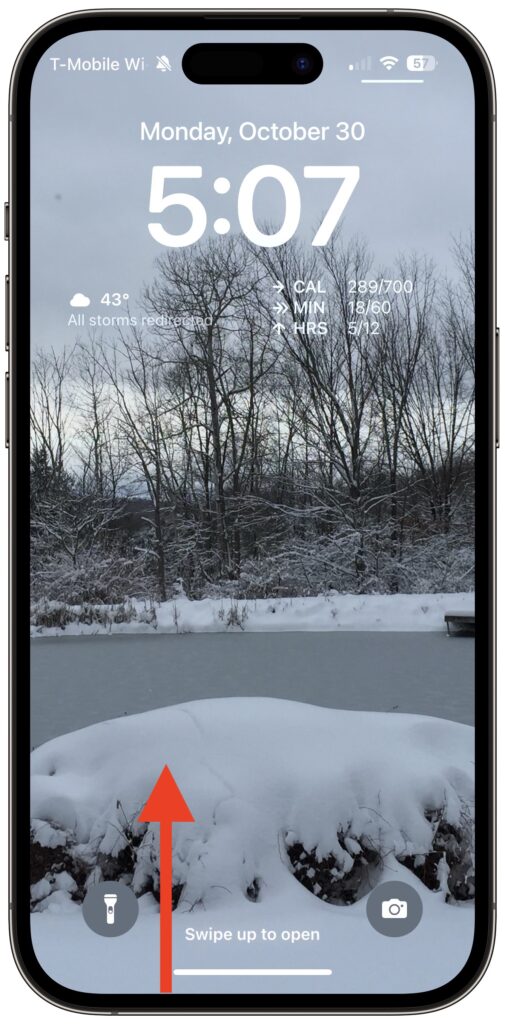
Once the iPhone is awake (the screen is lit up), you unlock an iPhone with Touch ID by pressing the Home button. On an iPhone with Face ID, you swipe up from the bottom of the Lock Screen—a bar reminds you where to start—while looking at the iPhone. Face ID is fast and accurate enough that you’ll notice that authentication is happening only if iOS asks to verify your passcode (which it also does with Touch ID).
Return to the Home Screen
When you’re using an app on an iPhone with Touch ID and want to return to the Home Screen, you press the Home button—logical! On an iPhone with Face ID, you repeat that swipe up from the bottom of the screen action you use to unlock the iPhone. You’ll get really good at it.

Switch between Apps
When it comes to switching between apps, iPhones with Face ID offer a unique shortcut. On an iPhone with Touch ID, you must quickly press the Home button twice and then swipe between apps in the App Switcher. Bringing up the App Switcher on an iPhone with Face ID requires swiping up from the bottom of the screen just slightly and then continuing the swipe to the right. But Face ID experts seldom do that. Instead, swipe right and left on the bar at the bottom of the screen to switch between apps—it’s far faster and easier, if hidden.

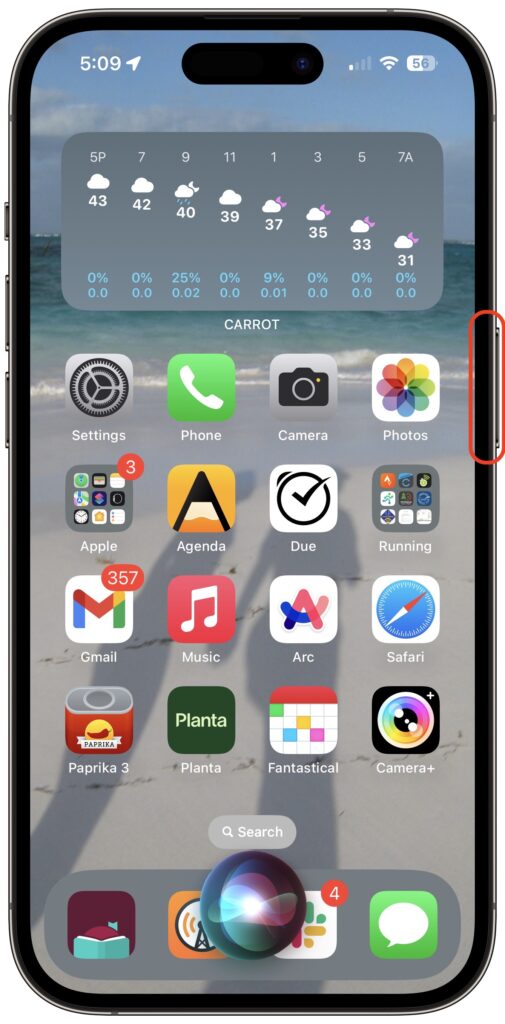
Activate Siri
On an iPhone with Touch ID, holding the Home button activates Siri. On an iPhone with Face ID, press and hold the side button to activate Siri. Tomato, tomahto.
Open Control Center
When all we had were iPhones with Touch ID, Apple decided we’d open Control Center by swiping up from the bottom of the screen. Face ID relies on that gesture for unlocking and opening the App Switcher, so on iPhones with Face ID, you instead open Control Center by swiping down from the top right of the screen. Think of it as swiping down from the cellular, Wi-Fi, and battery status icons.

View Notifications
Because iPhones with Touch ID use a swipe up from the bottom for Control Center, they can devote a swipe down from the top of the screen to displaying the Lock Screen with notifications. The same gesture works on an iPhone with Face ID, but you must start from the left side of the screen.

Use Apple Pay
Paying for a purchase with Apple Pay requires that you authenticate, which means placing your finger on the Home button—but not pressing it!—on an iPhone with Touch ID. Getting the hang of the touch-but-don’t-press action can take some time, but once you have it, you may even have developed a habit of not looking at your iPhone to authenticate Apple Pay. In contrast, with an iPhone with Face ID, you must look at the screen when prompted so the Face ID sensors can confirm you’re making the purchase. Honestly, neither is as easy as double-pressing the side button on an Apple Watch.

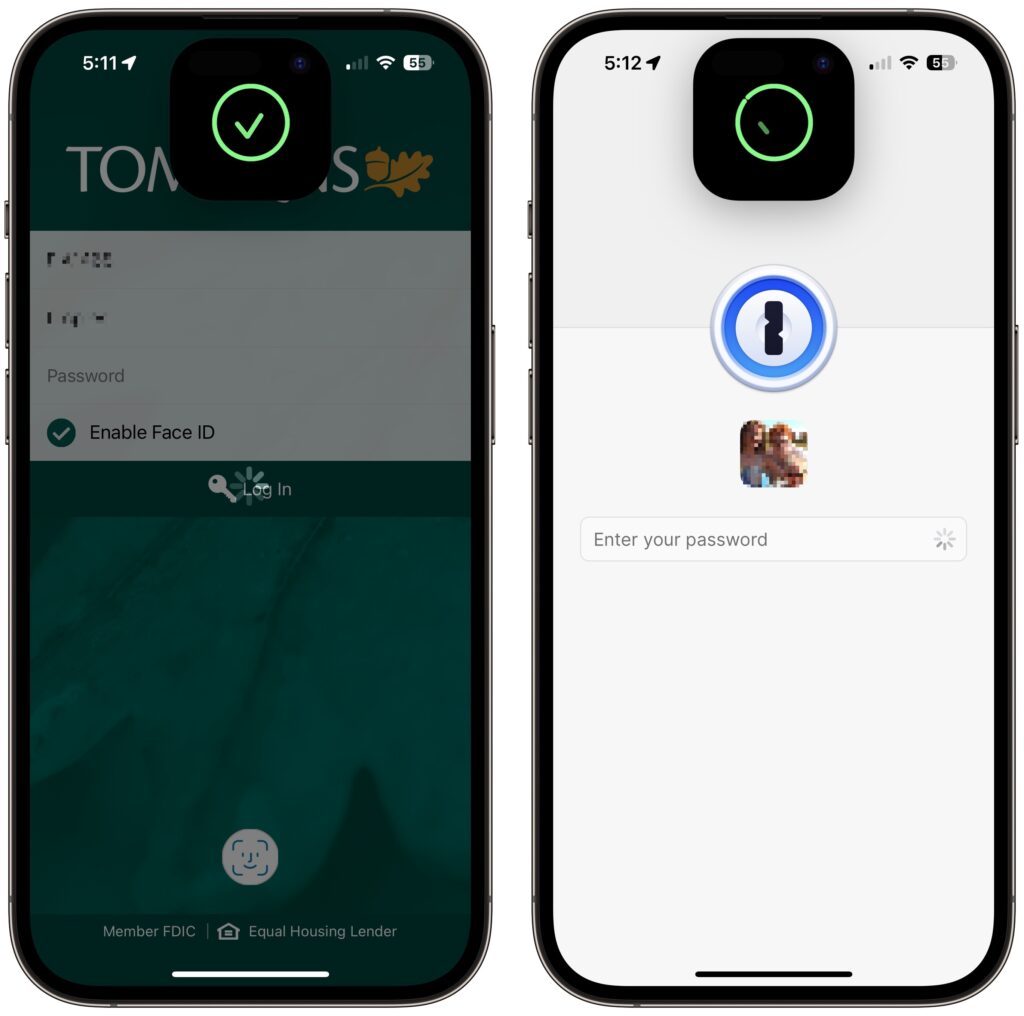
Authenticate in Apps
Beyond Apple Pay, plenty of apps from the App Store, like password managers and banking apps, tie into biometric authentication so you don’t have to type lengthy passwords. As you’d expect, if you previously authenticated by touching the Home button, doing so on an iPhone with Face ID requires looking at the iPhone screen. That’s nearly always what you do anyway, so it’s even easier than touching the Home button.
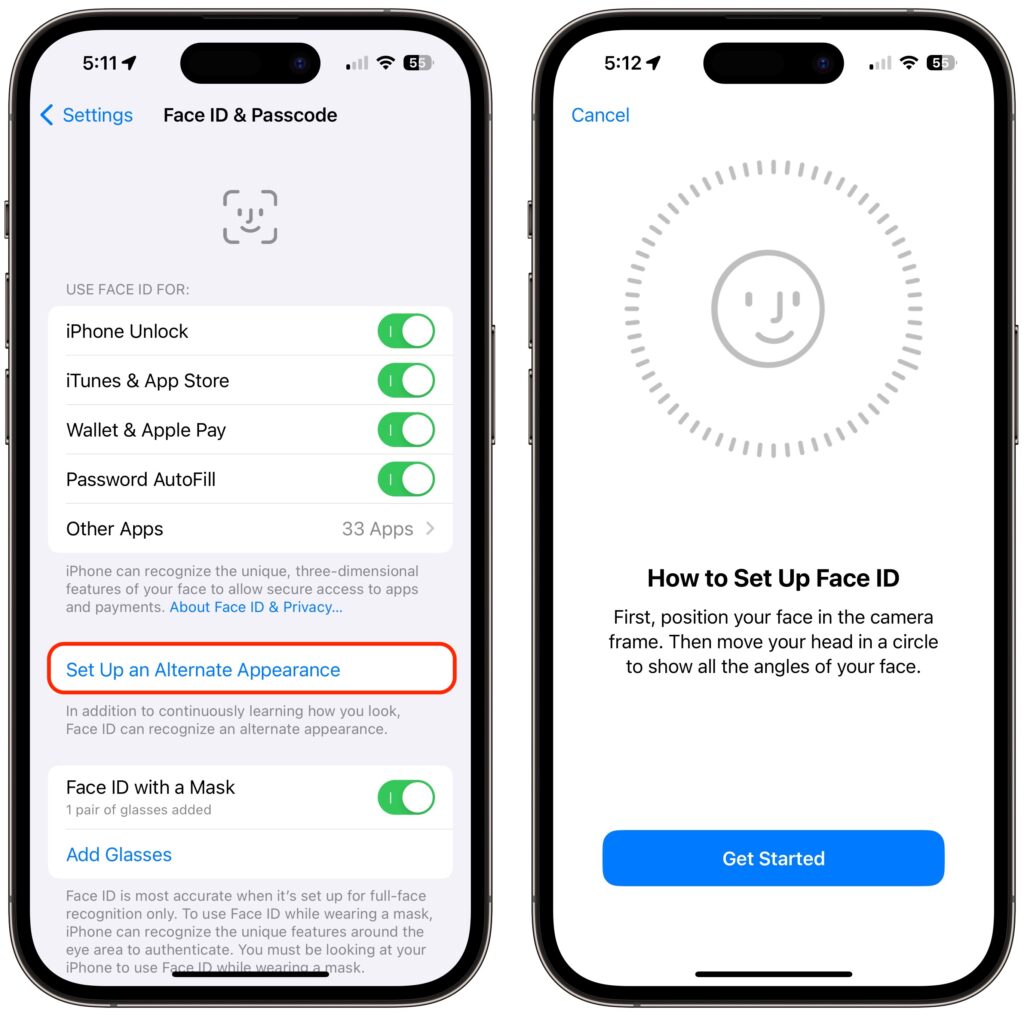
Register Alternate Appearances
With Touch ID, you can register up to five fingers, which lets you use several of your own and let a trusted spouse or family member authenticate using Touch ID as well. We tend to have more fingers than faces, though, so with Face ID, Apple allows only a single alternate appearance. That shouldn’t be too limiting, but if everyone in your family had a Touch ID finger, sorry, you’ll have to pick a favorite.
(Featured image by Apple)
Nov 1, 2023 | Apple News, Hardware, Top

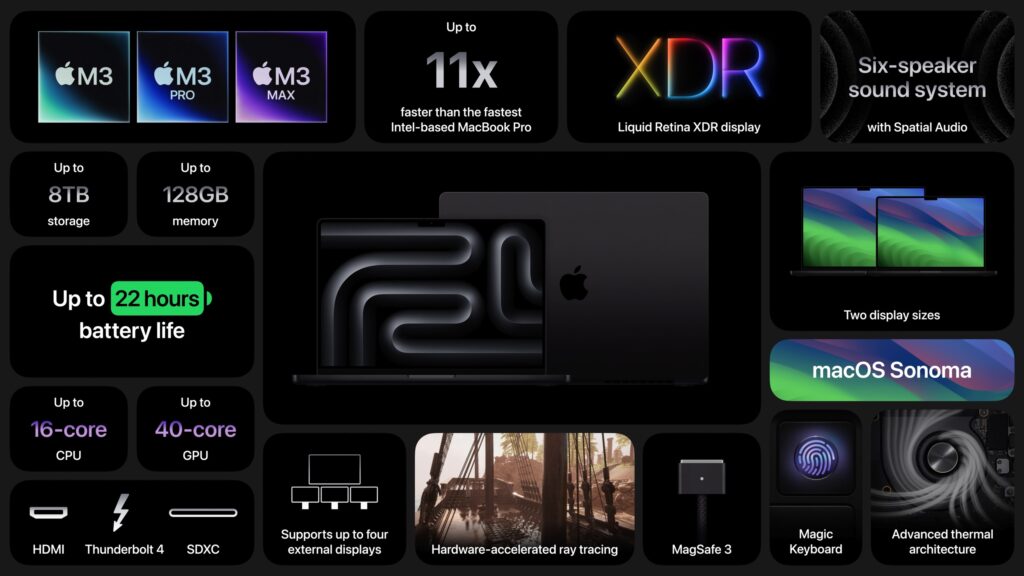
At Apple’s Halloween-themed Scary Fast event on October 30, the company unveiled its next-generation Apple silicon chips for Macs, the M3, M3 Pro, and M3 Max. Apple also showcased new 14-inch and 16-inch MacBook Pro models and a faster version of the 24-inch iMac based on these chips. They’re available to order now, with units in stores and orders starting to arrive on November 7, apart from the M3 Max models that will arrive in late November. Apple also dropped the awkwardly positioned 13-inch MacBook Pro model from the lineup, leaving the low end to the highly capable MacBook Air.
Apart from the new chips, the updated MacBook Pro models boast only a brighter screen, a slightly longer battery life in the M3 14-inch model, and a new Space Black aluminum finish for the M3 Pro and M3 Max models. There are no other changes for the M3 24-inch iMac.
M3, M3 Pro, and M3 Max Bring More Power to the 14-inch and 16-inch MacBook Pro
Although the MacBook Air has done an admirable job of supporting everyday laptop users, professionals who rely on processor-intensive apps have long turned to the 14-inch and 16-inch MacBook Pro for more power. Apple updated the MacBook Pro to the M2 Pro and M2 Max in January 2023, a release that probably came later than Apple wanted. There’s less reason to upgrade from an M2 model to a new M3 one, but the performance gains are significant when upgrading from Intel-based and M1 models.
The M3 MacBook Pro models beat the equivalent Intel-based MacBook Pro models by 3x, 5.5x, 7.4x, and even 20x, depending on the specific app and task. Overall, Apple claims speed improvements up to 11x over the fastest Intel-based MacBook Pro. Gains over equivalent M1-based MacBook Pros are also significant, with improvements from 30% to 60%.
Apple expanded the options for the 14-inch MacBook Pro, so there are now three basic configurations:
- M3 starting at $1599: It has an 8-core CPU, 10-core GPU, 8 GB of memory, and 512 GB of storage. You can (and probably should) jump to 16 GB of memory; 24 GB is also available. This model has only two Thunderbolt/USB 4 ports and can drive only a single external display.
- M3 Pro starting at $1999: You have two options here: either 11 or 12 CPU cores and 14 or 18 GPU cores, and either 18 GB or 36 GB of memory. These models feature three Thunderbolt/USB 4 ports and support one or two external displays.
- M3 Max starting at $3199: The maxed-out configuration also sports two options: either 14 or 16 CPU cores and 30 or 40 GPU cores, plus 36 GB of memory, upgradeable only to 96 GB. These models also have three Thunderbolt/USB 4 ports but can drive up to four external displays.
The 16-inch MacBook Pro has only M3 Pro and M3 Max configurations:
- M3 Pro starting at $2899: There’s only one option here, matching the beefier 14-inch M3 Pro model: a 12-core CPU, 18-core GPU configuration with 36 GB of memory.
- M3 Max starting at $3499: The choices here are either 14 or 16 CPU cores and 30 or 40 GPU cores. The lower-end configuration comes with 36 GB of memory and can upgrade to 96; the higher-end configuration has 48 GB of memory and has options for 64 GB or 128 GB.
Storage starts at 512 GB for the M3 14-inch model and 1 TB for the rest, with options for 2 TB, 4 TB, and 8 TB.
Note that the M3 14-inch MacBook Pro replaces the awkwardly positioned M2 13-inch MacBook Pro, which offered only the slightest advantage over its cheaper M2 13-inch MacBook Air cousin. The new M3 14-inch MacBook Pro does cost $100 more than the comparable 13-inch MacBook Pro that it replaces, but that’s a fair trade for the bigger, better screen and 1080p FaceTime HD camera. Now there’s once again a clear physical and performance distinction between the MacBook Air and the MacBook Pro lineups.
Otherwise, some prices have increased, but in most cases, that may be because the new configurations include more unified memory. For instance, the M3 Pro 16-inch MacBook Pro previously started at $2499 with 16 GB of memory, but now starts at $2899 with 36 GB of memory. Regardless, the professionals buying these speedy Macs can often justify paying more if the performance boost directly increases productivity.
M3 Chip Improves 24-inch iMac Performance
There isn’t much to say about the refreshed 24-inch iMac, which trades its M1 chip for an M3 but sports no other notable changes and keeps its $1299 starting price. The 24-inch iMac remains an attractive option for anyone looking for an all-in-one desktop Mac.
The switch to the M3 does provide more memory choices. Previously, you could choose only 8 GB or 16 GB of memory. With the M3, 8 GB of memory remains standard, but you can upgrade to either 16 GB (a good idea) or 24 GB (probably unnecessary for most people). Storage still starts at 256 GB, which isn’t much these days, particularly if you take a lot of photos or videos, and you can upgrade to 512 GB, 1 TB, or 2 TB.

Apple gave no hints that it is considering a replacement for the popular 27-inch iMac that Apple discontinued when it introduced the Mac Studio and 27-inch Studio Display. Though the 24-inch iMac has an impressive 4.5K Retina display, it’s still smaller than the 5K Retina display in the 27-inch iMac. Speculation has swirled around the possibility of a 32-inch iMac Pro, but given that a Mac Studio starts at $1999 and the 32-inch Pro Display XDR sells for $4999, it’s hard to imagine such an iMac Pro having a competitive price.
Also missing from the announcement was any mention of USB-C versions of the Magic Keyboard, Magic Trackpad, and Magic Mouse. Those accessories continue to use the Lightning connector and ship with a USB-C to Lightning cable for charging.
(Featured image by Apple)
Social Media: Apple has unveiled the M3, M3 Pro, and M3 Max chips alongside new 14-inch and 16-inch models of the MacBook Pro that use the new chips. The company also refreshed the 24-inch iMac, replacing its M1 with an M3.
Oct 2, 2023 | Security, Tips & Tricks
The hardest time to remember your iPhone or iPad passcode is right after you’ve changed it. Generally speaking, there’s no reason to change your passcode, but if you inadvertently or intentionally shared it with someone with whom you wouldn’t trust your bank account information, changing it to something new is a good idea. We could also imagine a child who knows your passcode changing it on you as a prank. For whatever reason, if you can’t enter your new passcode, a new iOS 17 feature called Passcode Reset lets you use your old one for 72 hours. Once you’ve tried the wrong passcode five times, tap Forgot Passcode ➊, enter your old passcode ➋, and create a new one ➌. If you’re certain you know the new one, you can expire the old one sooner in Settings > Face ID/Touch ID & Passcode.

(Featured image by iStock.com/NazariyKarkhut)
Oct 2, 2023 | Tips & Tricks
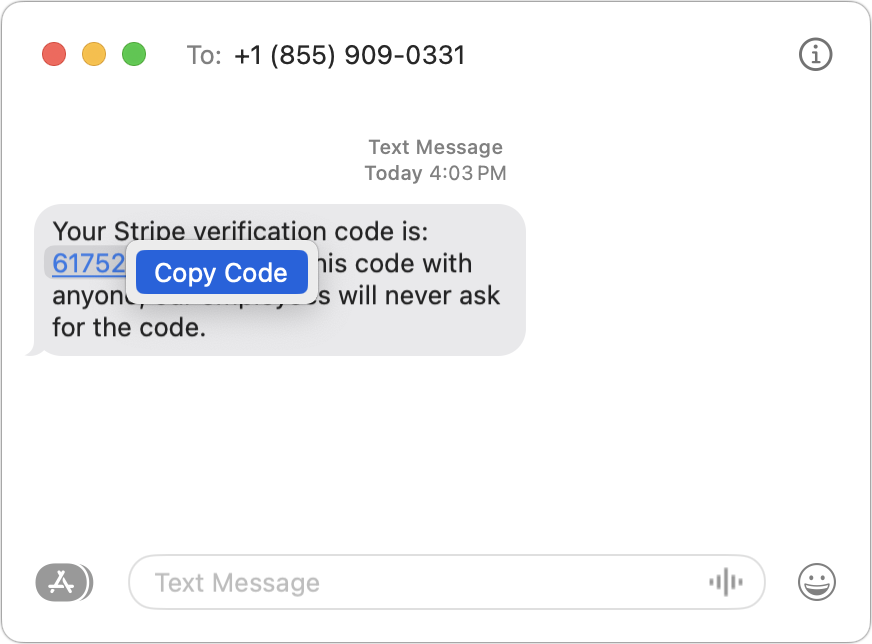
One welcome feature of Safari is its automatic detection and auto-filling of SMS-based two-factor authentication codes you receive in Messages. It allows you to complete your login quickly, without having to retrieve the code from Messages. But what if you use a different Web browser, like Google Chrome, Firefox, Brave, or Arc? Apple doesn’t allow other developers access to those codes in Messages, but Messages itself recognizes the verification code, marking it with an underline. Rather than transcribing the code manually like an animal, you can Control-click the underlined numbers and choose Copy Code. Then, switch to your Web browser and press Command-V to paste it. Not all websites accept pasted codes, but most will, even if they present a custom interface.
(Featured image by iStock.com/Galeanu Mihai)